Vibrant hues, fresh flavors, and the satisfying art of rolling-homemade vegetarian sushi offers a delightful journey into the world of culinary creativity. Crafting colorful vegetarian sushi rolls at home isn’t just about assembling ingredients; it’s an invitation to explore textures, balance tastes, and paint your plate with nature’s freshest palette. Whether you’re a seasoned sushi lover or a curious kitchen adventurer, making these lovely bites from scratch allows you to customize every roll, turning wholesome vegetables and aromatic rice into edible works of art. In this article, we’ll dive into the essentials of preparing, selecting, and creatively combining colorful veggies to master the craft of vegetarian sushi right in your own kitchen.
Crafting colorful homemade vegetarian sushi rolls at home is an art form that allows you to celebrate vibrant produce while creating stunning, tasty dishes bursting with texture and flavor. The beauty of these rolls lies not only in their vivid hues but also in their balance-fresh, crunchy vegetables wrapped in perfectly seasoned sushi rice, skillfully rolled to create a feast for both the eyes and palate.
Prep and Cook Time
- Readiness: 25 minutes
- Cook Time: 20 minutes
- Total Time: 45 minutes
Yield
- 4 sushi rolls (serves 4)
Difficulty Level
- Medium – Beginner-pleasant with mindful practice
Ingredients
- 1 ½ cups sushi rice
- 2 cups water
- ¼ cup rice vinegar
- 2 tablespoons sugar
- 1 teaspoon salt
- 4 sheets nori (seaweed)
- 1 medium avocado, sliced thin
- 1 small cucumber, julienned
- 1 medium carrot, peeled and julienned
- ½ cup thinly sliced purple cabbage
- ½ red bell pepper, cut into thin strips
- Fresh cilantro or microgreens for garnish
- Soy sauce or tamari, for dipping
- Wasabi and pickled ginger (optional)
Instructions
- Prepare sushi rice: Rinse the sushi rice under cold water until the water runs clear to remove excess starch. Drain well.
- Cook the rice: Combine rinsed rice and 2 cups of water in a saucepan. Bring to a boil, then reduce heat to low, cover, and simmer for 15 minutes. Remove from heat and let it steam for another 10 minutes without removing the lid.
- Season the rice: In a small bowl, mix rice vinegar, sugar, and salt until dissolved. Transfer cooked rice to a wide wooden or glass bowl. Gently fold the vinegar mixture into the hot rice with a wooden spatula using cutting motions (avoid mashing).Allow rice to cool to room temperature, ideally fanning to add a subtle gloss.
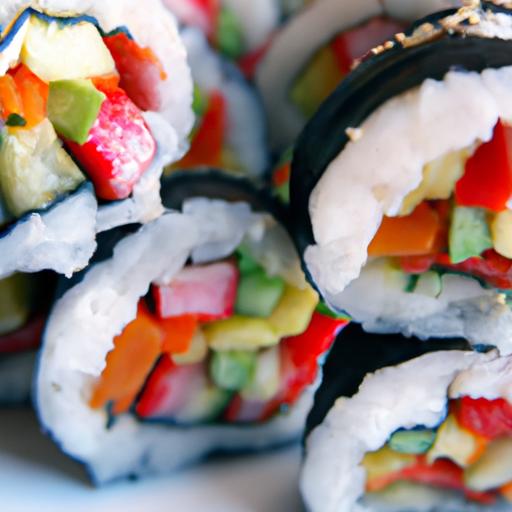
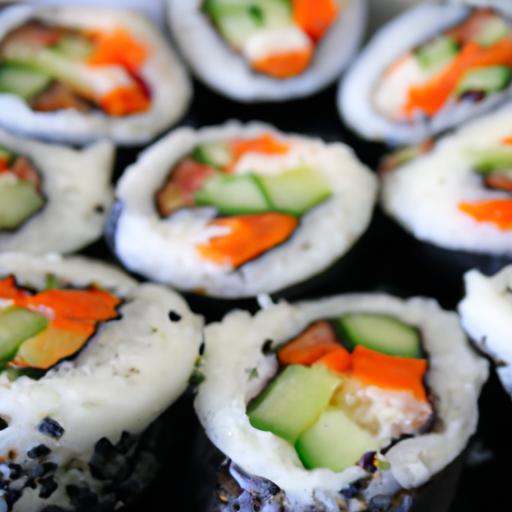
- Prepare fillings: While rice cools, cut avocado, cucumber, carrot, purple cabbage, and red bell pepper into thin, even strips to ensure smooth rolling and balanced texture.
- Set up your rolling station: place a bamboo sushi mat on a clean surface. Lay a sheet of nori shiny side down on the mat.
- Spread rice on nori: With wet hands, evenly spread about ¾ cup of sushi rice over the nori, leaving a 1-inch border at the top edge for sealing. Be careful to keep a thin, even layer to avoid bulky rolls.
- Add vegetable fillings: Arrange a colorful stripe of each vegetable horizontally about 1 inch from the bottom edge of the rice-covered nori.
- Roll the sushi: Lift the edge of the bamboo mat closest to you and carefully roll over the fillings, pressing gently but firmly to shape a compact cylinder. Pull the mat as you roll, ensuring tight, even pressure. Seal the roll by moistening the uncovered edge of the nori with water to help it stick.
- Cut the rolls: Using a sharp, dampened knife, slice each roll into 6-8 equal pieces. Clean the knife with a wet towel between cuts for clean edges.
- Serve: Arrange sushi pieces on a platter, garnish with fresh cilantro or microgreens, and serve with soy sauce, wasabi, and pickled ginger.
Tips for Success
- Rice texture is key: Overcooking can lead to mushy rice, while undercooking makes it hard and flaky. Using a rice cooker will help achieve perfect consistency every time.
- Moist hands prevent sticking: Always keep your hands damp while spreading rice to avoid it sticking and tearing the nori.
- Customize fillings: Feel free to experiment with roasted sweet potato, marinated tofu, or thin strips of mango for an extra pop of flavor and color.
- Make ahead: Sushi rice can be cooked and seasoned up to 4 hours in advance; keep covered with a damp cloth at room temperature to maintain moisture.
- Rolling technique: Practice rolling without fillings first to build confidence and improve your grip and pressure control.
Serving Suggestions
Present your colorful vegetarian sushi rolls on a sleek slate or bamboo serving board to enhance their vibrant hues. sprinkle toasted sesame seeds or finely chopped chives over the rolls for added texture and elegance. Complement with small dipping bowls of dark soy sauce and a mound of vivid pickled ginger. A side of chilled edamame or a light seaweed salad enriches the experience, creating a beautifully balanced, fresh meal.
| Nutritional Info (per serving) | Calories | Protein | Carbs | Fat |
|---|---|---|---|---|
| Vegetarian sushi roll (1/4 recipe) | 220 kcal | 5 g | 42 g | 4 g |
Explore more vegetarian Asian recipes to expand your culinary repertoire. For expert insights into sushi rice preparation, check out this extensive guide on Serious Eats.

Q&A
Q&A: Crafting Colorful Homemade Vegetarian Sushi rolls at Home
Q1: What makes vegetarian sushi rolls a great choice for homemade cooking?
A1: Vegetarian sushi rolls are a delightful canvas for creativity-they’re vibrant, healthy, and accessible. Without fish, you can experiment with endless vegetables, fruits, and even grains, crafting sushi that’s not only visually stunning but packed with fresh flavors and textures. Plus, they’re perfect for accommodating various dietary preferences and make a fun, hands-on meal to prepare with family or friends.
Q2: Which vegetables work best for adding color and crunch to these sushi rolls?
A2: Think rainbow inspiration! Crisp cucumber, bright orange carrot sticks, creamy avocado, vibrant red bell pepper, earthy shiitake mushrooms, and crunchy asparagus spears all add bursts of color and differing textures. Pick a combination that pleases your eyes and palate-mixing soft, crunchy, sweet, and savory creates a balanced roll.
Q3: How do you prepare sushi rice for the perfect sticky base?
A3: Sushi rice is short-grain rice cooked to a tender, sticky consistency. After cooking, gently fold in a seasoning mixture of rice vinegar, sugar, and salt while the rice is still warm. This imparts the signature tangy-sweet flavor and makes the rice sticky enough to hold your fillings together perfectly without being mushy or dry.
Q4: What tools do I need to roll sushi at home, and can I do it without specialized equipment?
A4: A bamboo sushi rolling mat (makisu) makes shaping rolls clean and easy, but if you don’t have one, a clean kitchen towel or even your hands can do the trick! A sharp knife for slicing and a bowl of water to wet your fingers (to prevent sticking) are also handy. The key is gentle, confident pressing and rolling.
Q5: Are there any fun dips or toppings to complement vegetarian sushi rolls?
A5: Absolutely! Classic soy sauce infused with a touch of wasabi is a gorgeous start. Sprinkle toasted sesame seeds or finely chopped nori strips on top for crunch and umami. Pickled ginger adds zest and refreshment between bites. For extra flair, drizzle spicy mayo (vegan if you prefer) or tangy ponzu sauce, enhancing flavor layers.
Q6: Can I include unconventional ingredients to make my sushi rolls unique?
A6: definitely! Sweet mango slices, ripe strawberries, or juicy pineapple add a tropical sweetness that contrasts beautifully with savory sushi rice. Roasted sweet potato or tempura-fried vegetables bring warm, hearty notes. Experimenting is part of the joy-just balance flavors and textures to keep each bite exciting.
Q7: How do I store vegetarian sushi rolls if I want to prepare them in advance?
A7: Sushi is best enjoyed fresh, but if you need to store rolls, wrap them tightly in plastic wrap and refrigerate for up to 24 hours. Let them sit at room temperature for a few minutes before eating to soften the rice. Avoid freezing, as it can ruin the texture and moisture of both rice and vegetables.
Q8: What are some tips to keep my vegetarian sushi rolls neat and intact?
A8: Don’t overload your roll-think thin layers of rice and fillings. Keep your hands moist when handling rice to prevent sticking. Roll with steady pressure, sealing the nori edge with a dab of water. Slice each roll with a sharp, wet knife using a gentle sawing motion to maintain clean cuts.
With these tips and tricks in hand, your homemade vegetarian sushi rolls will not only taste delicious but dazzle with color and creativity. Roll up your sleeves and let your culinary artistry shine!
Future Outlook
as you wrap up your first batch of vibrant, homemade vegetarian sushi rolls, remember that the true beauty of this craft lies not only in the burst of colors and flavors but in the joy of creation itself. With a little patience and a dash of creativity, your kitchen can transform into a sushi studio where every roll is a canvas waiting to be painted with fresh, wholesome ingredients. So grab your bamboo mat, experiment with textures and tastes, and let each bite be a celebration of health, artistry, and mindful eating. Your colorful culinary journey has just begun-one roll at a time.