There’s something undeniably magical about sourdough-the tangy aroma, the perfect crust, and that satisfying chew that tells a story of time and patience. But what if you’re navigating this timeless craft without gluten, the very protein that gives traditional bread its structure? Welcome to the interesting world of gluten-free sourdough, where science meets art, and every starter is a living, bubbling promise of appetizing possibility.
In this guide, we’ll unravel the mysteries of mastering gluten-free sourdough, from nurturing your first starter to baking loaves that rival their wheat-based cousins. Ready to embark on a journey that transforms simple ingredients into something extraordinary? Let’s get started.
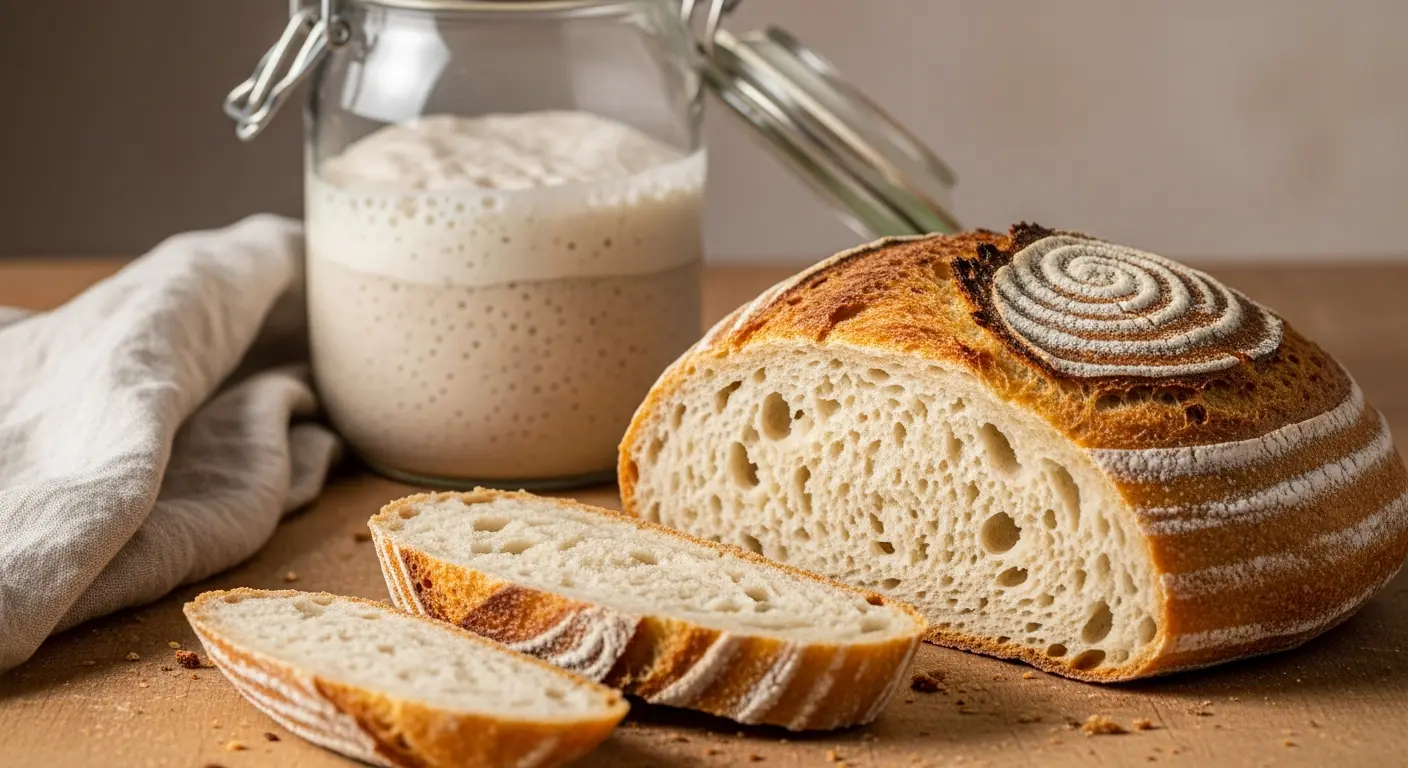
Mastering Gluten-Free Sourdough opens a door to a world of naturally leavened breads that are both nutritious and delicious, even without traditional wheat flours. Creating and nurturing a gluten-free sourdough starter is an art intertwined with fascinating science-microbial fermentation, flour composition, and hydration all play critical roles. This journey transforms simple gluten-free flours into a living, bubbly ecosystem bursting with wild yeast and beneficial bacteria, offering complex flavors and irresistible textures.
Prep and Cook Time
- Readiness: 15 minutes (initial setup)
- Fermentation: 5-7 days (starter growth)
- Feedings & Maintenance: 5-10 minutes per day
Yield
- Approximately 1 cup of active gluten-free starter ready for baking
Difficulty Level
- Medium – requires patience and attentive care
Ingredients
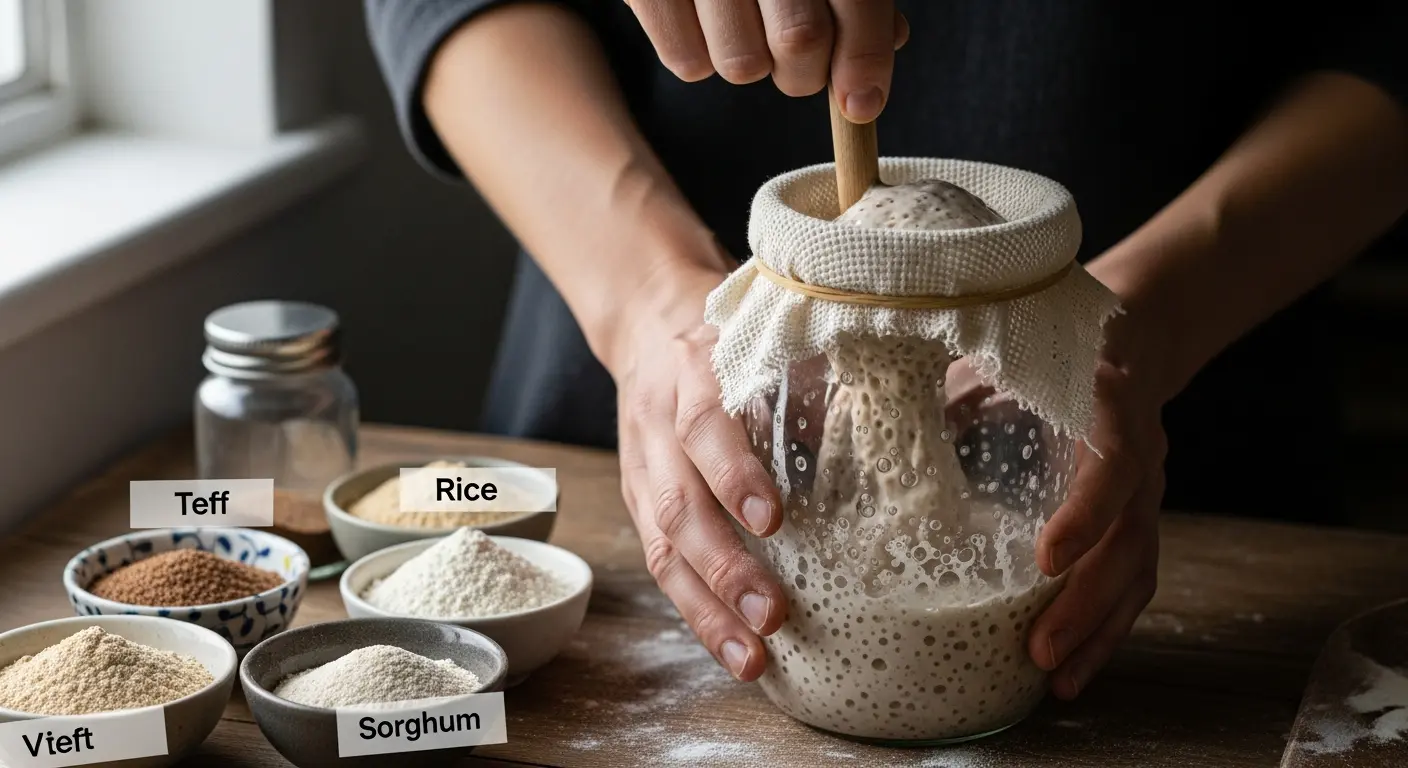
- 1/2 cup brown teff flour – nutty flavor, great for fermentation
- 1/4 cup sweet white rice flour – adds lightness and smooth texture
- 1/4 cup whole grain sorghum flour – boosts nutrients and structure
- 3/4 cup filtered water, room temperature
- 1 tablespoon chia seeds (optional, for extra fermentable material)
- Additional filtered water for feedings
Instructions
- Day 1: Combine the flours in a clean glass container. Stir together brown teff, rice, and sorghum flour until fully blended.
- Add filtered water and chia seeds if using, then mix thoroughly until you get a thick, batter-like consistency; it should resemble pancake batter, around 75%-80% hydration.
- Cover the jar loosely with a breathable cloth or coffee filter secured with a rubber band to allow airflow but block contaminants.
- Keep the container at a warm spot (ideally 75-80°F) for 24 hours. You may see tiny bubbles forming-this means your wild yeast is awakening.
- Day 2 to 4: Discard half of your starter daily, then feed with 1/4 cup gluten-free flour blend and 1/4 cup filtered water. Stir well and maintain the loose cover, monitoring for rise and activity.
- By Day 5 or 6, the starter should double in size within 4-6 hours of feeding and be pleasantly tangy with a slight sweetness and yeasty aroma.
- if after day 7 you see no activity, try boosting your starter with a pinch of organic unfiltered apple cider vinegar or ensure your feeding times and water/flour ratios are accurate.
- Maintaining your starter: Once vibrant, feed your starter with 1:1 ratio (by weight) of flour and water daily if kept at room temperature, or weekly if refrigerated.
Why This Flour Blend?
Gluten-free flours behave very differently in fermentation. The combination above balances protein content, starch, and fermentable sugars-key for feeding wild yeast and lactobacilli. Brown teff provides robust flavor and excellent fermentation support, rice flour adds lightness, while sorghum enriches nutrient density and helps retain moisture.
Troubleshooting Common Challenges and Enhancing Flavor Profiles
Sometimes your gluten-free starter might be slow to bubble or develop off odors. Remember, patience is key, but so is a suitable environment. Keep your starter consistently warm and well-hydrated. if your starter smells overly sour or vinegar-like, it may be hungry or overfed-adjust feeding intervals accordingly.
To deepen flavor complexity, try occasional feedings with a touch of dark molasses or a tablespoon of gluten-free rye flour, which contributes aromatic compounds prized in traditional sourdough.
Tips for Success
- Use filtered or bottled water to avoid chlorine, which inhibits fermentation.
- Maintain a warm environment between 75-80°F for optimal yeast activity.
- Feed your starter at the same time daily to establish routine and consistent fermentation.
- Keep the container clean and avoid metal utensils; use wood or plastic spoons instead.
- Once active, keep a portion refrigerated for ease and feed weekly to maintain vitality.
Serving Suggestions
After successfully mastering your gluten-free sourdough starter, use it to craft beautifully crusted, slightly tangy breads perfect for toasting or sandwiches. For a fresh touch, garnish loaves with toasted sunflower seeds or sprinkle coarse gluten-free oats on top before baking.
Enjoy your homemade gluten-free sourdough bread with rich butter, honey drizzle, or your favorite avocado spread. The starter also adds depth to pancakes, waffles, and pizza crusts, creating exciting new culinary adventures.

| Nutrient | Per 100g Starter |
|---|---|
| Calories | 120 |
| Protein | 3.5g |
| Carbohydrates | 25g |
| Fat | 0.6g |
For deeper insight into gluten-free fermentation science, check out this scientific review on sourdough microbiology. Also, explore our complete gluten-free baking tips to elevate your baking success further.
Q&A
Q&A: Mastering Gluten-free Sourdough – Your Starter Guide
Q1: What makes gluten-free sourdough different from traditional sourdough?
A: The biggest difference lies in the flour. Traditional sourdough relies on wheat’s gluten network to develop structure and chewiness, while gluten-free sourdough must create that texture without gluten’s stretchy magic. This means using option flours like brown rice, buckwheat, or sorghum, combined with a carefully nurtured starter and frequently enough additional binders to mimic that signature sourdough crumb.
Q2: How do I start a gluten-free sourdough starter from scratch?
A: Begin with a simple mix of gluten-free flour and water-think equal parts by weight, around 50 grams each to start. Use a gluten-free flour with natural enzymes and nutrients, such as brown rice or sorghum. Keep the mixture at room temperature and feed it daily with fresh flour and water. Within about 5 to 7 days, you’ll see bubbles and a tangy aroma – signs that your starter is alive and ready to rise to the occasion.
Q3: Can I use any gluten-free flour for my starter?
A: Not all gluten-free flours are created equal for sourdough. Nutty, whole-grain options like buckwheat, teff, and millet encourage microbial activity thanks to their nutrient content. Rice flour works but may ferment more slowly, while more refined flours might lack the nutrients necessary to build a robust starter. Experimentation is key, but starting with a blend often yields the best results.
Q4: Why is patience so important when mastering gluten-free sourdough?
A: Gluten-free sourdough starters tend to be a bit slower and sometimes less predictable than their gluten-full cousins. The microbial community develops differently, so it takes patience and consistent feeding to cultivate a lively, bubbly starter. Rushing the process can lead to weak or inactive starters, resulting in dense bread. Think of your starter as a wild creature you’re gently taming; give it time to thrive and reward you.
Q5: How do I maintain a gluten-free sourdough starter long-term?
A: Maintenance is love! Keep feeding your starter regularly-daily at room temperature if you bake frequently enough, or store it in the fridge and feed weekly if you bake less frequently. Use clean utensils and containers, monitor for off smells or mold, and always feed with your preferred gluten-free flour. With consistent care, your starter can last for years, developing depth and complexity in its flavor.
Q6: What tips will help me bake the perfect gluten-free sourdough loaf?
A: A few golden rules:
- hydration matters. Gluten-free doughs are frequently enough wetter and stickier than traditional doughs. Don’t be afraid to use more water.
- Use xanthan gum or psyllium husk as binders to help trap gases and improve crumb structure.
- Longer fermentation times deepen flavor and improve rise.
- Experiment with hydration, proofing times, and baking temperatures to suit your flour blend.
- Lastly, embrace imperfection-a rustic, hearty crumb and tangy flavor are the hallmarks of true sourdough.
Q7: Is gluten-free sourdough healthier than regular sourdough?
A: Gluten-free sourdough can be a nutritional powerhouse, especially when made from whole grains like buckwheat and teff, providing fiber, minerals, and vitamins. The fermentation process also reduces phytates and enhances nutrient availability. However, “healthier” depends on individual dietary needs and flour choices. It’s a fantastic option for those with gluten sensitivities or celiac disease seeking flavorful, fermented breads.
Q8: Where can I find resources and community support for gluten-free sourdough baking?
A: Dive into online forums, Facebook groups, and Instagram communities dedicated to gluten-free baking. Websites like the Perfect Loaf and gluten-free baking blogs provide recipes, troubleshooting tips, and inspiration. Sharing your journey not only motivates you but also connects you to a tribe of fellow fermenters all mastering the gluten-free sourdough craft.
Ready to embark on this wild, tangy adventure? With time, patience, and a dash of creativity, your gluten-free sourdough starter will unlock a world of delicious, nourishing loaves that rival their traditional counterparts. Happy fermenting!
Insights and Conclusions
As you embark on your gluten-free sourdough journey, remember that patience and curiosity are your greatest allies. Each batch of starter you nurture is a living testament to the art and science of fermentation-an ever-evolving canvas where wild yeasts and tangy flavors harmonize. With this guide in hand, you’re not just baking bread; you’re cultivating a tradition that’s uniquely yours, free from gluten but rich in character. So, feed your starter, embrace the rhythms of rising dough, and savor the satisfaction of every golden, crusty loaf. Mastery is just a few folds and proofs away-happy baking!